Thursday, August 30, 2012

Tip #91: Tools (Part 3: The Landscape Lens)

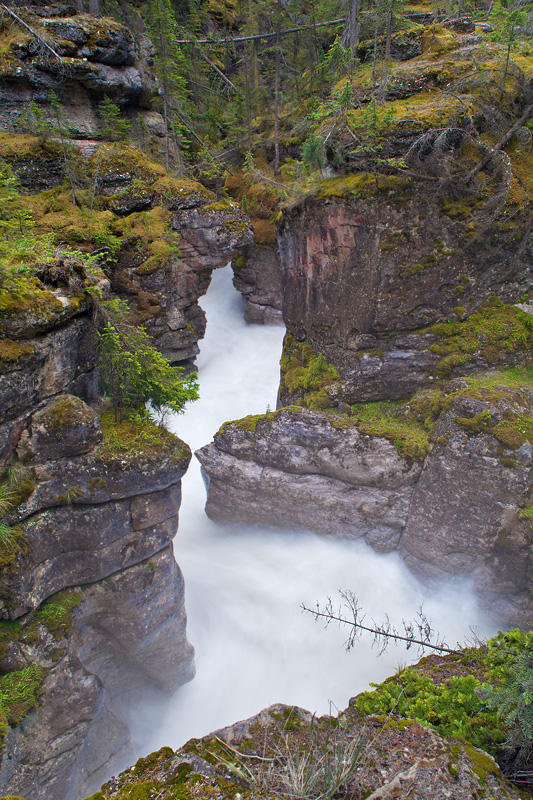
Water in the Slot - Banff National Park, Canada
Canon 5D mark II + Canon 24mm f3.5L TSE
In tip #83 I describe the five key features I need in a camera, while tip #84 considers the essential characteristics of a wildlife lens. In this, my final gear post, I share my thoughts about selecting a lens for landscape photography.

In many ways choosing your lens for wildlife photography will be simpler than finding the “ideal” landscape optic. Animals adapt to environmental pressures with elusive behaviors, cryptic patterns and a healthy dose of fear. To produce wildlife images, we use telephoto lenses that will compress distant landscapes and isolate wary quarry from a cluttered environment. Ultimately the selection of a wildlife lens depends more on ones budget than the target you seek to photograph (see tip #84). Sadly, this calculus is not as easy when looking for the “perfect” landscape lens.

First, consider the vast array of subjects that reside within the landscape umbrella. Many landscape photographers seek to convey the essence of a place by capturing it all. These images imply the enormity of our world and can extend from toe to infinity. Here depth of field is king, as it is used to focus attention on strong foreground elements and the most distant details. 

Alternatively, some landscapes are defined by the minute patterns in an ecosystem or city. These can be images of fall leaves swirling in an ephemeral pool, waterfalls framed by mossy rocks, or surreal “lichenscapes” that might easily be confused with the Martian surface (go Curiosity!). Whatever the subject, landscape photographers are pattern seekers who claim a continuum from the microscopic to the macroscopic as their own. As such, it can be quite a challenge to select only one lens to meet this diverse need

Given the broad nature of the landscape genre, nearly any lens can be a suitable landscape optic. What follows are three strategies to consider prior to making another expensive purchase.

Ask Yourself... What is your primary Subject?
One Lens to Capture it All
When flexibility is your priority, consider investing in a wide-angle to normal or wide-angle to telephoto zoom. These lenses rely on clever optical designs that allow a shooter to capture both the expansive landscape and details of a micro-scape. I suggest that you look for a zoom lens with a fixed aperture and LD, ED, or APO glass elements. As with telephoto lenses, these specialized glass elements reduce blur by focusing the varying wavelengths of light (ie: ROYGBiV) at one point. In addition, consider finding a wide-angle zoom that employs aspherical optical elements. Aspherical lenses are engineered and ground to have a non-spherical (thus “aspherical”) lens to air surface. By including this specialized type of glass in a wide-angle, disturbing distortion is reduced and even eliminated. The addition of these specialized elements really improve the optical quality of zooms, which represent an engineering compromise in order to meet their zooming function. My favorite all purpose Canon zoom is the 24-105 f4.0L IS. This would make a great one lens kit for the generalist who wants to travel and shoot it all. For those using a camera with a full-frame sensor (Canon 5D-series, Canon 1Ds-series, Nikon D700-D800, D3x or D4) and hoping to specialize in traditional landscape subjects, consider purchasing a 17-40 f4L (Canon) or 16-35 f4-ED (Nikon). Those using cameras with APS-sized sensors (most other digital SLR’s) should look at lenses in the 10-24mm range. Nearly every lens manufacturer has a quality lens in this focal length. In fact, I’ve recently added the Tokina 12-24mm f4 ATX II to support our cropped 7D bodies, and have found this to be as good as any Canon super wide-angle zoom I’ve used or owned. 
Regardless of your choice, if you are seeking flexibility, include a wide-angle zoom in your bag.

Self Imposed Constraints for Creativity
While Tamy likes the flexibility of a zoom lens, I prefer to work with prime optics. In fact, in addition to my two camera bodies, I only carry three lenses with me in the field. In general, I attach a 300 f2.8L IS to a Canon 7D with its cropped APS-style sensor, and alternate my other two lenses on my Canon 5D mark II. The latter lenses are a 100mm f2.8L IS macro and a 24mm f3.5L TSE manual focus lens. I thrive on the constraints and minimalism of this simple system. While all of my the optics include apochromatic glass or aspherical elements that increase detail while reducing distortion, they do not zoom. Instead, I zoom with my feet, spend time studying my composition and work very slowly. The absence of the zoom is a self imposed constraint that forces me to process the entire shooting experience.

There is no one best landscape lens nor one best landscape shooting technique. We live with a cornucopia of options that facilitate infinite possibilities. Find a style, select a lens and make some images.

©2000-2012 BTLeventhal.com / Bruce & Tamy Leventhal. All rights reserved. No image on this site may be used without permission.

Wednesday, August 22, 2012

Tip #90: Wait for the Interaction

I'm the Boss, Got It! (Cervus Canadensis) - Jasper National Park, Canada
We watched a lazy elk herd for over an hour waiting for an Interaction
Canon 7D + Canon 300mm f2.8L IS
Sometimes is pays to wait it out. Patience and endurance are a key part of every wildlife photographer's toolkit. Give it time, and you just might transform a good photo op into a great one.
Meddling Mom! (Cervus Canadensis) - Jasper National Park, Canada
Canon 7D + Canon 300mm f2.8L IS

©2000-2012 BTLeventhal.com / Bruce & Tamy Leventhal. All rights reserved. No image on this site may be used without permission.

Monday, August 20, 2012

Purposeful Work

Sunrise on Lake Alexander - Lake Alexander Preserve, MN
Canon 7D + Tokina 12-24mm f4.0 DX-II
“The Crow Wing County Board of Commissioners got a standing ovation at their meeting this spring when they approved the (Minnesota) DNR’s request to create the Mille Lacs Moraine Scientific and Natural Area...” 

And so the story goes...
Fortunately for me, I was in the right place at the right time. Having recently won a photo contest that placed an image of red-eyed tree frogs in the 2013 Nature Conservancy calendar, I mustered the courage to offer my skills to this organization that I so admire. After requesting a few extra calendars for my files, I suggested that “The Conservancy” (TNC) tap into my passion for conservation photography. 

Flagged for only a few assignment thus far, I hope to contribute images that inspire a conservation ethic. Pictures can transform abstractions into realities and convey a mood where words might otherwise fail. If our work moves others to contribute their time, their money or their vote to the conservation of wild spaces, then it is purposeful work to me. 

©2000-2012 BTLeventhal.com / Bruce & Tamy Leventhal. All rights reserved. No image on this site may be used without permission.

Wednesday, August 15, 2012

Tip #89: Look Harder

Sleeping House Boats - St. Croix River, MN
Canon 5D markII + 24mm f3.5 TSE
Building on my suggestions in tip #69... mine your home town. 
Patience and creativity can transform your boring home into a photographic treasure. Every time I leave the house, I stare at the light and study the way it scatters about and reflects the sky. I’m open to discovery and will readily shed the car’s armor to explore with my feet. It happened just yesterday while on a familiar road that I frequent regularly. I was driving, I stopped to photograph a tree and instead saw a staircase to the water. It was a new perspective of my river; it was a place I had visited but had never seen. 
In the Shadow of the Sun - St. Croix River, MN
Canon 5D markII + 24mm f3.5 TSE
It’s easy to become bored after traveling abroad or experiencing life on the road. Yet, there is so much to see at home if you’re open to creative thoughts and willing to look a little harder. 
Motored Waves - St. Croix River, MN
Canon 5D markII + 24mm f3.5 TSE

©2000-2012 BTLeventhal.com / Bruce & Tamy Leventhal. All rights reserved. No image on this site may be used without permission.

Saturday, August 11, 2012

Tip #88: Fill Flash

Goldfinch (Carduelis tristis) & Ruby-throated Hummingbird (Archilochus colubris)
Snake River Conservation Area - MN
Canon 7D + Canon 300mm f2.8L IS + Canon 320EX Flash


Caveat emptor... I am not an authority (or even a reliable source) on this topic. I love ambient light and will do nearly anything to avoid a flash. To be clear, I’m not anti-flash... I’m a flash ignoramus, a neophyte who lacks the hours of repetition that defines experience. Thus, I suggest you take my thoughts about flash with a bit of skepticism and consult the following links to inform your flash technique: 
Balanced fill flash, when applied properly, can produce natural images that appear as if they were made in ambient light. Small birds are an ideal subject for a bit of artificial light; a little pop of flash will define feathers, illuminate eyes and add dimensionality to an otherwise flat image. My fill-flash technique works best when the subject is in shadow and at a distance from its background. To consistently produce nice images under these conditions, I do the following:
  1. Set the aperture near its maximum (in the posted shot I set the lens to f3.2)
  2. Select the corresponding shutter speed that will allow you to produce a natural and “correct (see prior blog post about correct exposures)” exposure. When photographing fast and unpredictable subjects, strive to shoot at 1/100 second or faster (in the posted shot I set the shutter to 1/200 second).
  3. Use an off-camera flash cord, radio trigger or infrared trigger to move the flash off the body. Long lenses and their hoods will obstruct the flash and create a distracting shadow. Additionally, images produced with on-camera flash often appear flat. By moving the flash off the camera, you can add light from an oblique angle and thus control the shadows.
  4. Set your flash to E-TTL (Canon), i-TTL (NIkon), or P-TTL (Sony). These are the “smart” flash settings that rely on the in-camera computer to balance the output of your flash with the subject, exposure and focus.
  5. Final Key Step... you must reduce the output of the flash by 1/3 to 2/3 stops (-1/3 to -2/3). With some cameras you set flash exposure compensation in the camera while other systems require that you do this on the flash. By reducing the output of the flash, the burst of light will only fill some shadows and add a highlight to the eyes. The retention of these shadows adds detail and dimensionality to the image without overpowering the ambient light.
Give it a try and good luck as you begin to use fill flash where natural light won’t cut it. 

©2000-2012 BTLeventhal.com / Bruce & Tamy Leventhal. All rights reserved. No image on this site may be used without permission.

Tuesday, August 7, 2012

Hello from across the Border

Off Lake Road
Canon 5D MarkII + Canon 24mm f3.5L TSE Pano Stitch  
We're in Canada again!...  
This time we're with good friends on sleepy little lake in Ontario living a bit of the cabin life. There's no electricity and no plumbing, but there's plenty of beauty and solitude to inspire this contemplative photographer.
Cheers from the road,
bruce
Distant Storm
Canon 5D MarkII + Canon 24mm f3.5L TSE Pano Stitch  

©2000-2012 BTLeventhal.com / Bruce & Tamy Leventhal. All rights reserved. No image on this site may be used without permission.


Thursday, August 2, 2012

Tip #87: Wait for the Moment

Black Rhinoceros (Diceros bicornis) - Ngorongoro Crater, Tanzania


The most valuable tool in my kit cannot be purchased in a typical shoppe; in fact, I’ve never seen one for sale. Sadly, this tool does not fit in my bag nor can it be passed on to another. It is a tool of the mind and must be acquired through deliberate practice.

Many years ago I traveled to Denali National Park with little more than a point and shoot camera and ten rolls of film. My little Pentax had a fixed 35mm lens, shot less than one frame per second and lacked the ability to adjust the focus or shutter. It was a “PhD” (push here dummy), a tool for the masses. I was a poor college student doing research in Alaska, and this camera was on loan from my family. 
I learned a lot about photography during my eight weeks in Alaska, yet none of the lessons had anything to do with optics, exposure or digital noise. In 1986 modern photography was a magazine, and digital referred to the numbers on an HP calculator. Memory cards and LCD screens weren’t even science fiction, they were unimaginable. Yet, with little more than the ability to load the film into that crappy camera, I managed to find THE key tool. 
Sunset from Moro Rock - Sequoia National Park, California
After spending six weeks on an island in the Bering Sea documenting seabird behaviors at five minute intervals, one learns to be patient. Long days in the sub-arctic, where the sun barely sets, offers the opportunity for focused and deliberate study. It was there, in a blind suspended over breaking waves, where I learned how to wait for the moment and see beyond the obvious. 
There are many essential tools available to the modern photographer; some are fantastically expensive while others are more modest. However, the key tool for the Nature and Wildlife Pictorialist (see Gavin Seim) is endurance and patience. During a long hike through Denali with my PentaCrap point and shoot I stumbled upon a pond, I previsualized the way the sun might set, and I put down my pack and waited. That was the day I made my first image, it was the day I became a photographer. 
©2000-2012 BTLeventhal.com / Bruce & Tamy Leventhal. All rights reserved. No image on this site may be used without permission.